by Helen McLean | Sep 2, 2014 | Food & Drinks
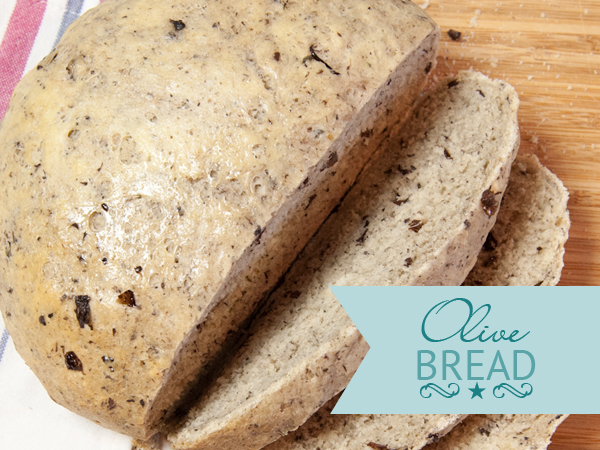
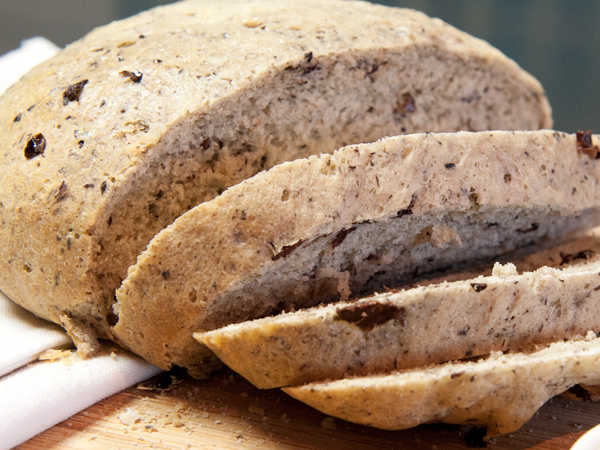
Homemade Olive Bread
Mmmmmm, can you smell that? The smell of bread baking in the oven, with a hint of olives and thyme?
I got addicted to olive bread when I discovered it at our local deli. I was happy to spend $5 on a small cob as a treat every now and then. But when I found this recipe in my hefty 500 page recipe book titled “The Art & Soul of Baking” – I had to give it go. I had never baked bread before, and always shied away from it as it seemed too technical for me. Cooking is one thing, baking is entirely another thing. Cooking to me is like art, a bit of this and a bit of that and voila! But baking is a precise science. Eeeek!
I first made one batch, which makes 2 decent sized cobs. And boy was I impressed. I made bread!
Now I will admit, this requires great preparation and time – but it’s not like you are in the kitchen for 10 hours. You’ll see my suggestion on how to time this right so it doesn’t impede on your day too much.
The first step requires you to make a concoction called Poolish. One look at how long it takes for the active ingredients to do their thing, and you immediately think you’ve got better things to do than watch yeast bubble up for 4-6 hours (or up to 12 hours). So what I do on a Friday night, is whisk together the Poolish and leave it on the bench until 8am Saturday morning. Total time spent so far: 15 minutes. To be continued…
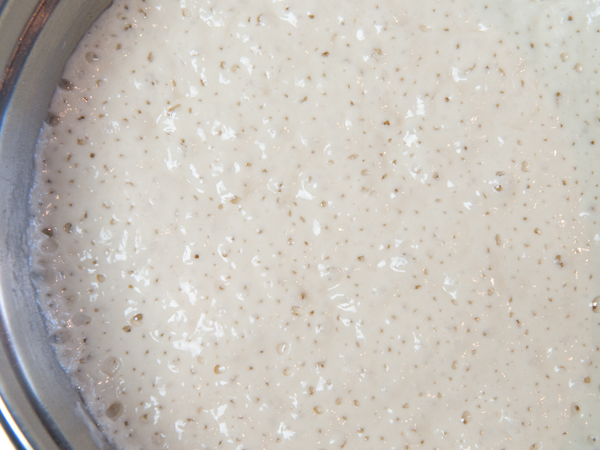
This, is an exciting picture of Poolish. Otherwise known as ‘Yeast doing what yeast does best.’
So on Saturday morning after my morning coffee, I start step 2: Mix, Rest and Knead the Dough. Total time spent in this step is 30 minutes.
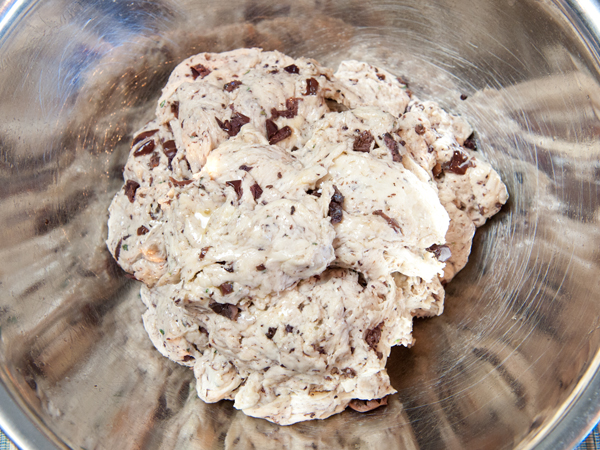
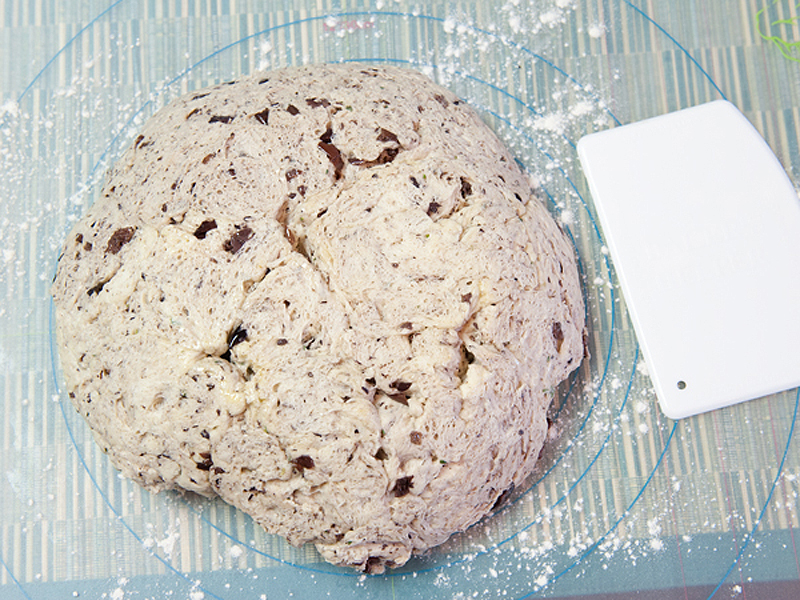
It’s not even 9am and I’m onto step 3: Rise the Dough (First Rise). Basically, all you are doing here is letting the dough rise until it has doubled in size (as you can see from the image above and below) and this process takes between 1.5-2 hours, depending on room temperature. This is where you can do other stuff! Do your shopping, meet with friends, whatever you like. The oven isn’t on yet, so it’s safe to leave the house while your dough is rising!
Once you’ve come back from your shopping or mini vacation, it’s time for step 4: Punch Down, Divide, and Shape the Loaf. So roll your sleeves up, put your apron back on and get on with this step, that will take no longer than 15 minutes total.
Step 5: Proof the Dough (Second Rise). All you are doing here is letting the little cobs you created in Step 4, double in size by leaving it alone for 45-60 minutes. As the book states, “they look like they have taken a deep breath”. While you wait for the second rise to happen, there’s time to unpack the shopping, put the washing on, create a blog post, do your hair or the gardening.
At this point, it’s about 12.15pm, and we’re up to the final step, step 6: Bake the bread. With a pre-heated oven, this part takes a mere 25-30 minutes. And that’s it!
So while on paper, the process looks like it’d take you 10 hours in total – the actual contact time is only 1 hour, or 1.5 hours if you’re standing impatiently by the oven for the last half hour.
The statistics – Is it worth it?
By now you probably know that I like to do my numbers on homemade staples. It’s not enough to ‘enjoy’ making bread. There’s got to be a cost saving in there too, which you’ll be pleased to know there is a saving of half of what the deli charges. Plus the cob size is larger and there’s no additives or preservatives. Plus your house smells awesome.
This one’s a keeper *
Although this bread is the absolute bees knees when consumed same day, you may as well make up 2 or 3 batches (which makes 4-6 cobs) and freeze them.
PS: In a few months, I’ll show you how I put a twist on this recipe for the Christmas table!
Full recipe ingredients and method can be found in:
Title: The Art & Soul of Baking, © 2008
By: Sur La Table with Cindy Mushet
Publisher: Andrews McMeel Publishing, LLC
Recipe: Rustic Olive and Thyme Bread
Page: 75
http://www.surlatable.com/
by Helen McLean | Jul 1, 2014 | Food & Drinks
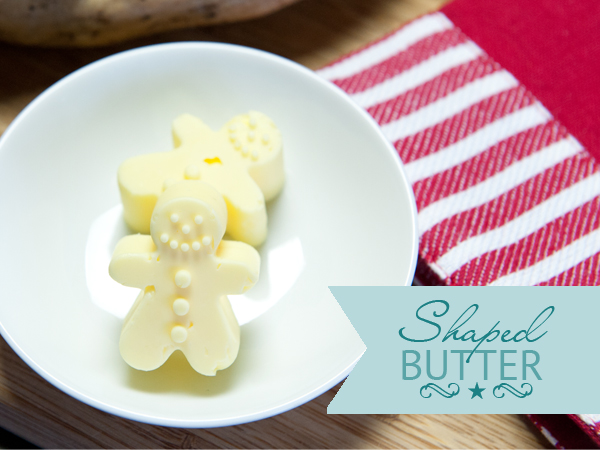
How to make Butter Shapes
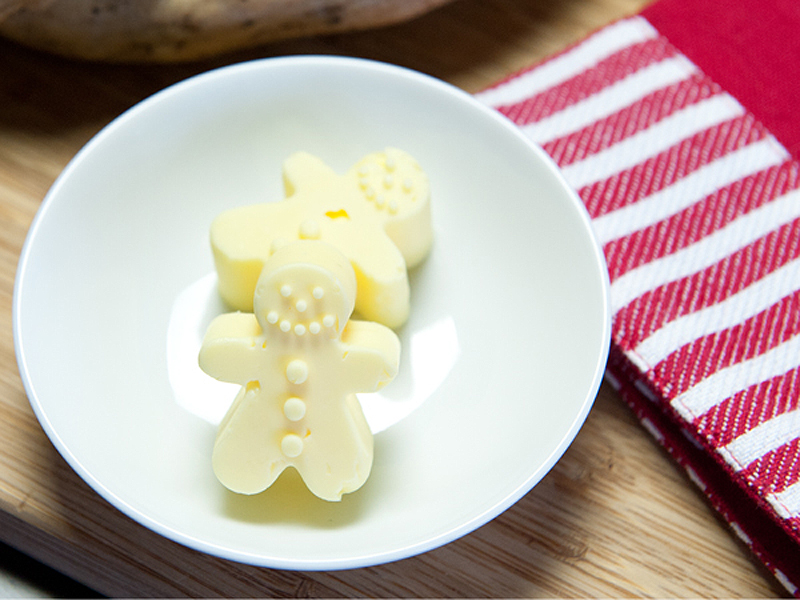
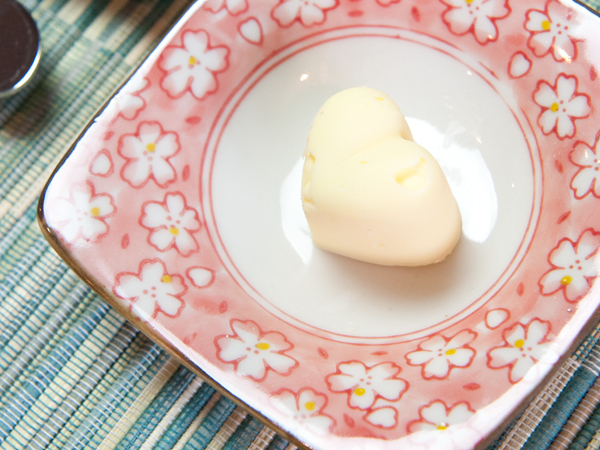
Ordinarily, I’d never think of serving shaped butter – you’d get it on a butter dish in it’s original form. But for our recent family lunch, I thought I’d get really creative with presentation. It’s such a simple and cute addition to the table – you’ll have friends and family poking at the shapes asking “what is this?” You’ll feel a little bit like Chef Heston – and that’s not a bad thing!
Shaped Butter Recipe
Ingredients:
Room temperature / soft butter
Silicon mold (ice mold / chocolate mold)
Basil, parsley or other herb (optional)
Method:
1. Use a mortar and pestle to grind the basil.
2. Mix well with the butter.
3. Use a teaspoon or small butter knife to place butter in the mold. The trick is to do this in small amounts and push the butter in well, to remove air bubbles.
4. Fill the mold to the top and smooth the top edge.
5. Place the tray in the freezer for at least an hour to set.
6. Carefully (depending on your shape) push out your butter shapes.
Once you’ve popped out the butter leave it to sit at room temperature for about 15 minutes before serving, so it’s easy to spread.
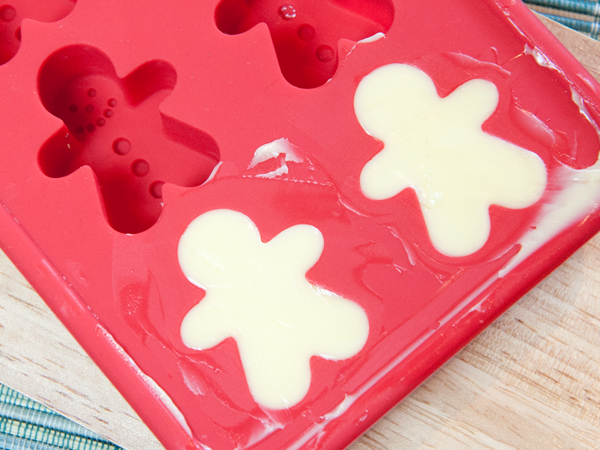

Note: Don’t melt the butter and pour into the molds! As fantastic as this idea sounds, the butter changes it’s composition when it is melted and the butter separates. You’ll have a liquid base that won’t freeze and a non-stable top layer.
Styling notes:
Floral butter dish – Daiso

by Helen McLean | Jun 16, 2014 | Food & Drinks

If you’re ever going to make a super simple yet impressive dessert, that satisfies both kids and adults alike – make a spider (also known as ice-cream soda and soda float). The only noise we hear at the table when spiders have been served (after the initial ooo’s and ahhh’s) is the tinking sound of spoons hitting the glass and slurping through straws.
I learned the craft of making spiders when I worked at Johnny Rockets (now called Soda Rock) in South Yarra. There was a particular method in making these, to make sure they were well presented. Sure it’s easy to plop a ball of ice-cream into a glass of soda, watch it fizz over and mix up into a creamy mess – but it’s just that, a mess to look at.

There’s an art to the layering of a spider, and you can create any flavour/colour combination you can think of (or be brave to try!)
Now, I’m not sure if I made up the addition of adding flavoured syrups to the spider, or if it was something that only us staff members were experimenting with – but it’s an addition worth keeping, both for extra flavour and colour.

Spider / Ice-cream Soda Recipe
Ingredients:
Vanilla ice-cream
Flavoured soda of choice
Flavoured syrup of choice
Classic milkshake style glass
Paper straw
Long spoon
Method:
1. Pour about 2cm of soda into the glass.
2. Scoop a large ball of ice-cream into the glass, big enough so it sits on the edges and doesn’t slip down into the base layer of soda. Ideally, you will have a 1-2cm layer of air in between the soda and the ice-cream.
3. Pour the syrup around the edges, just enough so you can see the syrup as a thin layer.
4. Top with more soda, but be careful not to fill to the top too quickly, otherwise it will overflow like a volcano!
Flavour combination ideas:
1. Jaffa – Orange soda and chocolate syrup
2. Candy Candy – Pink lemonade & blue heaven syrup
3. Citrus Tingle – Lemon squash & lime syrup
4. Strawberry & Cream – Lemonade & strawberry syrup
5. Tropicana – Passionfruit soda & lime syrup
6. Jingle Bells – Lime soda & raspberry syrup
7. Red, White & Blue – Raspberry soda & blue heaven syrup
As you can see, anything goes! Have some fun making your own combinations, and if you have a super delicious combination you have tried, make sure you share it below.
Soon I will share some grown-up only versions, once I finish experimenting with Kahlua, Creme de Cacao, Butterscotch Schnapps and Malibu, just to name a few.
Note: I think only Australian’s call them spiders. So be aware when you Google image search for inspiration, especially if you are arachnophobic. Try searching for ice-cream soda instead!
Styling notes:
Long spoon – Daiso
Glassware – Kitchenware Direct
Paper straws – Mozi

by Helen McLean | Jun 2, 2014 | Food & Drinks
Over the past 4 years or so, since a friend passed on this granola recipe to me – I have adapted and changed the recipe in various ways. The most recent experiment I have tried, is adding coconut oil & coconut syrup to substitute the sunflower oil & brown sugar. The end product still tastes amazing, and I’m limiting (or removing) sugar from breakfast. I have nothing against sugar, if it stays in my desserts!
With this granola recipe, I’d suggest starting with the original recipe to get a feel for it first, then experiment with various portions of the substitutions I have listed for you. Depending on the type and amount of binding products you use (rice malt, honey, coconut syrup, brown sugar), will depend on how clustered and chunky your granola will be. Just remember, you can’t go wrong with making granola – it’ll taste delicious every time. It’s so good, you could snack on it without adding any milk or yogurt!
Left to Right: Oats, Linseeds, Sunflower Seeds, Almonds (LSA)
Why would you bother?
If you’re as mad for granola as I am (and the rest of the family), you’ll also know that it’s one of the most expensive cereal types on the supermarket shelves, and the small box it comes in doesn’t last very long. By making your own, depending on which ingredients you choose to use, you can save a whopping 50% off the supermarket price (75% if you use no-name-brand oats).
When you consider that breakfast is one those regular things you do throughout your life, you can save a lot of money. For those who are interested in some quick calculations – here are some figures for you: If one person ate homemade granola cereal everyday for a year (which you wouldn’t), you’d save about $260pa. Just on cereal. Now multiply that by all your family members. For us, it’d be a saving of $780, if we ate it everyday (which we wouldn’t, but you get the idea).
Saving money isn’t the only benefit. You’d be in control of the various granola combinations, you can control the amount of sugars that you use, and you can control the amount of good stuff (nuts, seeds & fruits) you add. And if you need one more little reason, it feels soooo good to have made your own cereal.
Topped with dried cranberries & apricots.
Crunchy Breakfast Granola Recipe
Ingredients:
450g oats
250g sunflower seeds
2 tsp cinnamon
120g rice malt syrup
4 tbsp honey
100g brown sugar (sub. coconut syrup or more rice malt)
250g chopped almonds
1 tsp salt
2 tbsp sunflower oil (sub. coconut oil)
Additional options:
250g Linseed (blended).
By adding linseed, you have all 3 ingredients of the nutritious LSA – Linseed, Sunflower seeds & Almonds
Method:
1. Place an oven rack in the middle of the oven and turn oven on at 170 degrees C.
2. Place the sunflower oil (coconut oil), rice malt, honey and brown sugar (coconut syrup) in a small pot over the stove to melt and combine.
3. Mix all dry ingredients in a large bowl.
4. Pour combined oil and sweeteners over the dry ingredients and mix well.
5. Spread out the granola in an oven tray and place in oven for 30 minutes, taking out at 15 minute mark to turn and mix granola for an even browning.
6. Leave in the tray to cool. Once cooled, break it up and store into tall glass jars.
Serve with:
Milk or yogurt. Your choice of extras – diced dried apricots, cranberries, coconut chunks or fresh raspberries & blueberries.
Ingredients notes:
Oats – Traditional Uncle Toby’s (not Quick oats), or no-name-brand oats
Coconut products – Banaban Organic
Rice Malt Syrup – Pure Harvest
If you have made your own granola before and have any other suggestions to add, please share it in the comments below, I’d love to hear it!
Styling notes:
Pink bowl and flower condiment bowl – Daiso
Small wooden board – Daiso

by Helen McLean | May 20, 2014 | Food & Drinks
This visual culinary surprise, comes from a recipe book titled “The Art & Soul of Baking”, a hefty 500 page recipe book. There was no accompanying photo with this recipe, I was drawn to it simply because it had “Mexican” in the title. So you can imagine my surprise when I took a peek in the oven and saw the spectacular form taking place!
The actual title of the American recipe is “Mexican Chocolate Crackle Cookies”, however to save confusion for our family and other Australian readers, I refer to them as “cracked chocolate cookies”, as they are far from the children’s party treat we all know so well.
Although the recipe itself is not too advanced, you will need to plan ahead with this one. Once the yummy chocolate mass has been put together (butter, brewed coffee, chopped chocolate, eggs, sugar, flour, toasted almonds, cinnamon, baking powder & chili powder), it will need to be refrigerated for 1-2 hours, before making them into chocolately balls of goodness, ready to coat in sugar (granulated), and then more sugar (icing).
Why the reference to Mexico?
As far as I can tell, it’s only due to the addition of the chili powder in the list of ingredients. While this can be omitted, the spiciness from the chili is only slight and adds a nice warming aftertaste. It’s nothing to shy away from, and worth trying out.
If you wanted to make these cookies more Mexican, you could use traditional Mexican chocolate instead. You can buy Mexican chocolate (and other Mexican foods) from El Cielo.
These are so good looking, you’ll want to invite friends and family over for morning tea to show them off. You could even package a few of these up in clear cellophane bags sealed with a mix of green, white and red ribbons, and a hand written tag that says “Muchas Gracias“, for perfect little ‘thank you’ gifts.
Storage
The recipe states that they are best eaten same day and that any left overs can be stored in an airtight container at room temperature for 3-4 days. They are very more-ish so they probably won’t last the next day, however we have successfully kept these for a few days, uncovered.
Being the hostess with the mostess
This little tip in the book is fantastic, although I have never tried it myself. If you wish to create some for now and some for another time for almost “spur-of-the-moment cookies”, place the uncoated balls of chocolate on a tray in the freezer for 30-60 mins, then transfer them to a plastic freezer bag! You can freeze them for up to 3 months and when required, coat them in sugar and pop them in the oven and bake for about 16 minutes.
Full recipe ingredients and method can be found in:
Title: The Art & Soul of Baking, © 2008
By: Sur La Table with Cindy Mushet
Publisher: Andrews McMeel Publishing, LLC
Recipe: Mexican Chocolate Crackle Cookies
Page: 286
Styling notes:
Saucer with grapevine, from Daiso